
Yesterday my boyfriend was going to make some turkey. I asked why not roast it. He replied "there is something in the oven". I looked and the paper was still drying. So I took out the paper and he got his turkey. This morning I yelled at him that the pot on the stove wasn't a cusard. He said "he didn't know what it was but I was sure it was for crafting." He is the primary cook in the house which is a good idea. Ever since I tried to break down paper in the microwave oven. I kept putting a bowl of pink shreaded paper into the microwave over a two day period. He asks before eating anything I make! Anyway here are pictures of the finished paper.
The website www.Craftster.org was having a contest on outdoor crafting and I thought this was the perfect time to enter. Papermaking is my favorite hot weather hobby. You get to make paper and play in water at the same time.

Paper scraps.
A couple of days ago I took the scrap paper from the die cut scalloped hearts and set the paper to soak in a 15 quart steel pot. Today I heated up the whole mess. This was to further the break down of the paper and also to kill anything trying to live in the concoction. I just heated it to a gentle simmer and then turned off the heat and let it cool down.

Pot of paper scraps.
Making paper can be a rather slimy hobby. Once I retted a batch of corn husks. It was really repulsive. It is also a way to really upset your neighbors. There are a lot of good books out there on making paper from plant fibers. I like "Papermaking with Plants" by Helen Hiebert.

Paper scraps and water inside blender.
Recycling paper is an easier and less smelly way to make paper. It does need to soften and break down before putting it in the blender. It is a good idea to plan out any experiments before starting to pull sheets. This is because some additions to papers need to soak before using. It also takes the fun out of papermaking to stop everything and hunt for supplies. Which is what I did anyway.

Blended paper in blender jar. This is very thick usually the
contents would have more water but I wanted extra thick paper.
First I took two large handfuls of paper pulp and blended it with 3 cups of water for 3 minutes and then added 5 pieces of the botanical after removing the seeds. Then I pulsed the pulp another minute. I poured the pulp onto a bowl. Then processed another two large handfuls. Then I rinsed the blender jar, (not in the sink), unless your best friend is a plumber. Never leave equipment with paper in it!

The botanical I added to the paper. If I remember
right these are called angel wings. I put purple and
pink angel wings in the paper pulp.
right these are called angel wings. I put purple and
pink angel wings in the paper pulp.

Setting up frame and wash tub.
Outside I set up a wash tub and the paper frame. Then I added water to the tub so it was just a little higher then the bottom of the frame. That is important for a Nepalese style frame. The pulp must be floating above the paper screen when the pulp is poured. I then stirred the pulp and poured it into the frame. I shook the frame a little to even the pulp a bit. Then pulled the frame up and let the water drain.

Draining the pulp from the paper frame.
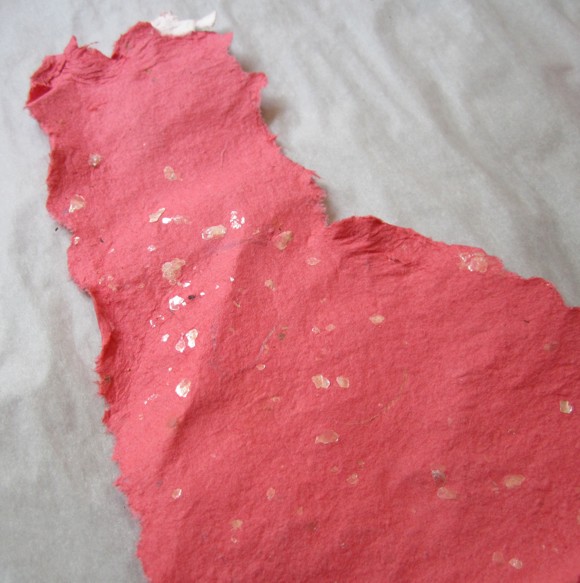
The first page failed totally! The second went a lot better. I was able to couch it onto some couching sheets. In all I had made 3 pieces of paper when I decided to do something special with the last sheet. I went inside and got some mica chips that were part of the rubber stamping equipment. I had a little oops and the paper will have more sparkle then intended.

Removing the frame from the sheet. The frame
is fastened to the plastic grid using Velcro.
is fastened to the plastic grid using Velcro.

Couched sheet of paper
Then all the equipment got rinsed of the pulp and dirt. A draw back of working outside is some dirt in the water and one piece of paper has some grass in it. When cleaning never rinse the pulp down drain! Be sure to clean everything as you use it. One time I had left a piece of paper in the blender jar and it welded itself to the jar. Next I put a piece of wood over the paper and then weight it down with the other equipment. The weight will squeeze the water from the paper and helps to form a sheet. Tomorrow I will see how the sheets are doing.
The final product!


Mica chips.
Not great looking paper but it was fun!
Finished pictures.

Here is an interesting site for supplies, I've never purchased from them. http://www.carriagehousepaper.com/
No comments:
Post a Comment